Synchronized Folders
What are Synchronized Folders
If you are incrementally adding a lot of data to the system, using the File → New → Horta Sample menu option can become tedious. If you create a Synchronized Folder, your data will be discovered as it is placed in storage, and Horta Samples will be automatically generated. The new Horta Samples can be made available to you or a group of users of your choice.
Synchronized Folders also load traced neurons, when those tracings are made available in a specific format. The MouseLight Open Data contains traced neurons alongside the imagery. If you use a Synchronized Folder to bring that data into Horta, you’ll also get Workspaces containing the published neurons that were traced on each sample.
Creating a Synchronized Folder
You can find Synchronized Folders near the top of the Data Explorer:
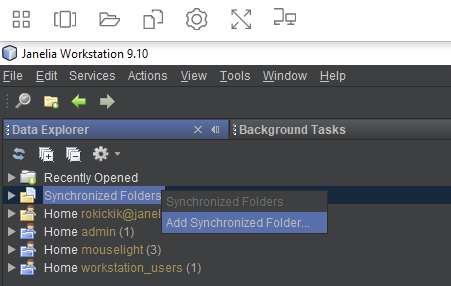
To add a new Synchronized Folder, right-click the “Synchronized Folders” node and choose “Add Synchronized Folder…”
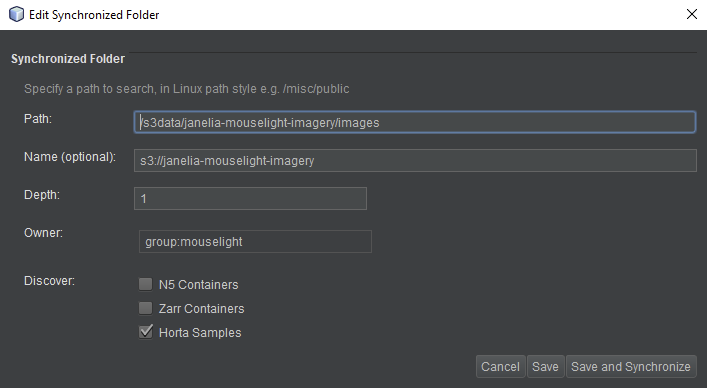
You can fill out the form as follows:
- The path you want to synchronize needs to be mounted and accessible through the back-end. Typically, S3 buckets are mounted as
/s3data/<bucket name>. If you don’t know the path to use, talk to your system administrator. - You can choose any name (i.e. label) for your synchronized folder. This is the name that will appear in the Data Explorer. It can include spaces and special characters if you wish.
- The depth is the depth of the hierarchy to traverse before reaching data to discover. In the example above we specify a depth of 1, since we are searching in the images subfolder. If we wanted to search the entire bucket (i.e. at the parent folder level), we would need to specify a depth of 2 to find the same Horta Samples.
- The owner is the user or group that will “own” the objects in the Workstation. This primarily affects who can see the objects in the Data Explorer. For example, if you choose a group here then everyone in the group will see the samples you discover.
- Finally, you should choose the data types that should be discovered while synchronizing with the file system. Typically, you’ll want to select Horta Samples here, but you can also discover other data types such as Zarr Containers, which can be viewed in 2D with the BigDataViewer modules.
Once you click “Save and Synchronized”, the backend will try to explore the path you provided and create objects corresponding to any data it finds. You can watch the progress in the “Background Tasks” panel (typically found on the right side of the screen, it can also be accessed via the Window → Core menu). Synchronization can take a while when there are a lot of traced neurons, such as with the MouseLight Open Data. Once the process is complete, you can click the Refresh button in the Data Explorer to see what was discovered.
Currently, synchronization is done only on-demand. If you add data later, make sure to right-click your Synchronized Folder and choose “Refresh Synchronized Folder”.
Feedback
Was this page helpful?
Glad to hear it! Please tell us how we can improve.
Sorry to hear that. Please tell us how we can improve.