Bare metal
Learn how to deploy a Horta instance on your own servers
Warning
This deployment method is no longer supported as we are shifting our development resources to the cloud deployment. You are on your own!The recommended way to deploy HortaCloud is to use Amazon Web Services (AWS), but you can also deploy the Horta services locally on your own client/server machines.
Using Docker Swarm, you can choose to deploy on two or three servers. The primary benefit of using three servers is that the MongoDB cluster will have a complete replica set for high availability.
1 - Two-server deployment
How to deploy Horta to a pair of servers
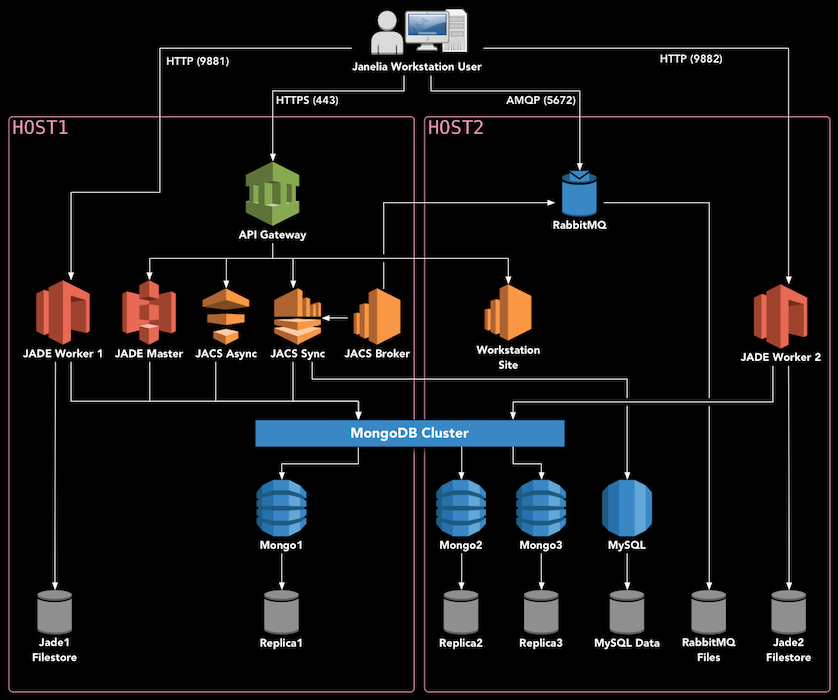
This document describes the canonical two-server Janelia Workstation deployment for supporting neuron tracing for the MouseLight project at the Janelia Research Campus and other research institutions. This deployment uses Docker Swarm to orchestrate prebuilt containers available on Docker Hub.
Deployment Diagram
Hardware Setup
The JACS backend consists of several services which need to be deployed on server hardware. We have tested the following configuration:
- Two Dell PowerEdge R740XD Servers
- Each server has 40 cores (e.g. Intel Xeon Gold 6148 2.4G)
- Each server has 192 GB of memory
- The hard drives are configured as follows:
- 2 x 200GB SSD in RAID1 - Operating system (/)
- 2 x 960GB SSD in RAID1 - Databases, user preferences, etc. (/opt)
- 12 x 10TB in RAID6 - Image files (/data)
The rest of this guide assumes that you have two server hosts dedicated to deploying this system, which are configured as listed above. They will be referred to as HOST1 and HOST2.
This two-server deployment can support 5-10 concurrent users. We use the following configuration for client machines:
- Dell Precision 5820 Tower
- Minimum of 8 cores (e.g. Intel Xeon W-2145 3.7GHz)
- 128 GB of memory
- Nvidia GTX1080Ti 11GB (reference card, blower fan style)
- Other similar cards will work fine: GTX1070, GTX1080, RTX2080
- Windows 10
Install Oracle Linux 8
The backend software runs on any operating system which supports Docker. However, Oracle Linux is used at Janelia and has been extensively tested with this software. Therefore, we recommend installing the latest version of Oracle Linux 8.
Install Docker
To install Docker and Docker Compose on Oracle Linux 8, follow these instructions.
Setup Docker Swarm
On HOST1, bring up swarm as a manager node:
On HOST2, copy and paste the output of the previous command to join the swarm as a worker.
docker swarm join --token ...
All further commands should be executed on HOST1, i.e. the master node. One final step is to label the nodes. Each node needs the “jacs=true” label, as well as “jacs_name=nodeX”.
docker node update --label-add jacs_name=node1 $(docker node ls -f "role=manager" --format "{{.ID}}")
docker node update --label-add jacs_name=node2 $(docker node ls -f "role=worker" --format "{{.ID}}")
docker node update --label-add jacs=true $(docker node ls -f "role=manager" --format "{{.ID}}")
docker node update --label-add jacs=true $(docker node ls -f "role=worker" --format "{{.ID}}")
Finally, you can run this command to ensure that both nodes are up and in Ready status:
Download the installer
Download the installer and extract it onto the master node, as follows. VERSION should be set to the latest stable version available on the releases page.
export VERSION=<version_number_here>
cd /opt
sudo mkdir deploy
sudo chown $USER deploy
cd deploy
curl https://codeload.github.com/JaneliaSciComp/jacs-cm/tar.gz/$VERSION | tar xvz
ln -s jacs-cm-$VERSION jacs-cm
cd jacs-cm
Next, create a .env.config file inside the intaller directory. This file defines the environment (usernames, passwords, etc.) You can copy the template to get started:
cp .env.template .env.config
vi .env.config
At minimum, you must customize the following:
- Set
DEPLOYMENT to mouselight. - Ensure that
REDUNDANT_STORAGE and NON_REDUNDANT_STORAGE point to the disk mounts you used during the operating system installation. Alternatively, you can make symbolic links so that the default paths point to your mounted disks. - Set
HOST1 and HOST2 to the two servers you are deploying on. Use fully-qualified hostnames here – they should match the SSL certificate you intend to use. - Fill in all the unset passwords with >8 character passwords. You should only use alphanumeric characters, special characters are not currently supported.
- Generate 32-byte secret keys for JWT_SECRET_KEY, MONGODB_SECRET_KEY, JACS_API_KEY, and JADE_API_KEY.
- If you want to enable automated error reporting from the Workstation client, set
MAIL_SERVER to an SMTP server and port, e.g. smtp.my.org:25.
Deploy Services
Now you can follow the Swarm Deployment instructions to actually deploy the software.
Import Imagery
If you have your own imagery, you will need to convert it before importing.
Each brain image is referred to as a “sample”. You should place each sample in $DATA_DIR/jacsstorage/samples on one of the servers. If you place the sample on the first server, in $DATA_DIR/jacsstorage/samples/<sampleDirectoryName>, then in the Workstation you will refer to the sample as /jade1/<sampleDirectoryName>.
As a side note if you use ’lvDataImport’ service to generate the imagery, the service does not use JADE to persist the data. So if you need the data to be on a storage that is only accessible on certain hosts, JACS must run on that host in order to be able to write the data to the corresponding location. If that is not an option you can generate the data to a temporary location then move it to the intended sample directory.
In the Workstation, select File → New → Horta Sample, and then set “Sample Name” to <sampleDirectoryName> and “Path to Render Folder” as /jade1/<sampleDirectoryName>.
Open the Data Explorer (Window → Core → Data Explorer) and navigate to Home, then “3D RawTile Microscope Samples”, and your sample name. Right-click the sample and choose “Open in Large Volume Viewer”. The 2D imagery should load into the middle panel. You should be able to right-click anywhere on the image and select “Navigate to This Location in Horta (channel 1)”, to load the 3D imagery.
This concludes the MouseLight Workstation installation procedure. Further information on using the tools can be found in the User Manual.
2 - Three-server deployment
How to deploy Horta to three servers
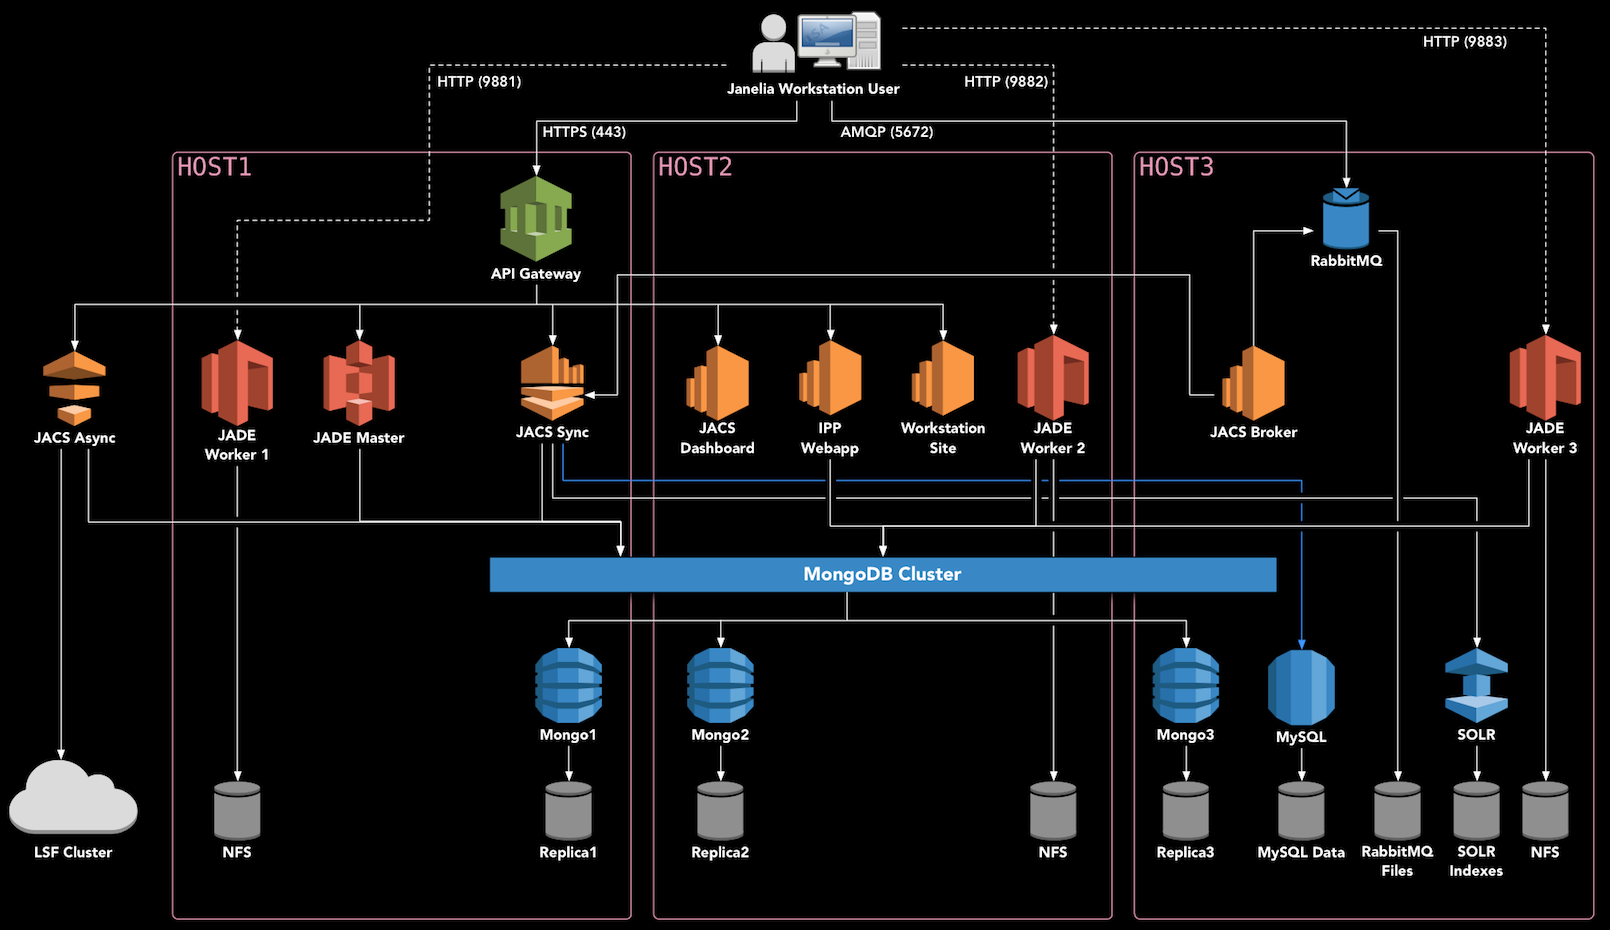
This document describes the full three-server Janelia Workstation deployment for supporting both FlyLight and MouseLight at Janelia Research Campus. This deployment uses Docker Swarm to orchestrate containers available on Docker Hub.
Multiple environments are supported with this deployment:
Deployment Diagram
Hardware Setup
This guide assumes that you have three high-end servers which can be dedicated to running Docker Swarm. We use 40-core servers with at least 192 GB of RAM. YMMV.
We’ll refer to the three deployment hosts as HOST1, HOST2, and HOST3.
Note that an additional server or VM is necessary to run the JACS Async Services outside of Docker, if you are planning to submit image processing jobs to an HPC cluster, such as with the Image Processing Pipeline (IPP).
Install Oracle Linux 8
The backend software should run on any operating system which supports Docker. However, Oracle Linux is used at Janelia and has been extensively tested with this software. Therefore, we recommend installing the latest version of Oracle Linux 8. Previously, we used Scientific Linux 7 and that is also known well although it’s no longer supported.
Install Docker
To install Docker and Docker Compose on Oracle Linux 8, follow these instructions.
Setup Docker Swarm
On HOST1, bring up swarm as a manager node, and give it a label:
On HOST2 and HOST3, copy and paste the output of the previous command to join the swarm as a worker.
docker swarm join --token ...
All further commands should be executed on HOST1, i.e. the master node. One final step is to label the nodes. Each node needs the “jacs=true” label, as well as “jacs_name=nodeX”. You can find out the node ids by running docker node ls.
docker node update --label-add jacs_name=node1 <id of HOST1>
docker node update --label-add jacs_name=node2 <id of HOST2>
docker node update --label-add jacs_name=node3 <id of HOST3>
docker node update --label-add jacs=true <id of HOST1>
docker node update --label-add jacs=true <id of HOST2>
docker node update --label-add jacs=true <id of HOST3>
Download the installer
Download the installer and extract it onto the master node, as follows. VERSION should be set to the latest stable version available on the releases page.
export VERSION=<version_number_here>
cd /opt
sudo mkdir deploy
sudo chown $USER deploy
cd deploy
curl https://codeload.github.com/JaneliaSciComp/jacs-cm/tar.gz/$VERSION | tar xvz
ln -s jacs-cm-$VERSION jacs-cm
cd jacs-cm
Next, create a .env.config file inside the installer directory. This file defines the environment (usernames, passwords, etc.) You can copy the template to get started:
cp .env.template .env.config
vi .env.config
At minimum, you must customize the following:
- Ensure that
REDUNDANT_STORAGE and NON_REDUNDANT_STORAGE point to the disk mounts available on the local systems. Alternatively, you can make symbolic links so that the default paths point to your mounted disks. - Set
HOST1, HOST2, and HOST3 to the servers you are deploying on. Use fully-qualified hostnames here – they should match the SSL certificate you intend to use. Do not use localhost or the loopback address (127.0.0.1). If you don’t have a DNS name for the hosts, use the host’s IP address. - Fill in all the unset passwords with >8 character passwords. You should only use alphanumeric characters, special characters are not currently supported.
- Generate 32-byte secret keys for JWT_SECRET_KEY, MONGODB_SECRET_KEY and JADE_API_KEY. If JADE_API_KEY is not set jacs-sync service will not be able to register any Mouselight samples.
- Set
JADE_AGENT_VOLUMES to the volumes that you want to be created when you start the system - typically jade1,jade2, but these really depend on the volumes that you you setup in your jade service configuration.
Enable Databases (optional)
Currently, Janelia runs MongoDB outside of the Swarm, so they are commented out in the deployment. If you’d like to run the databases as part of the swarm, edit the yaml files under ./deployments/jacs/ and uncomment the databases.
Deploy Services
Now you can follow the Swarm Deployment instructions to actually deploy the software.
Deploy ELK for monitoring
To deploy an ELK stack for monitoring follow ELK Deployment.
This concludes the MouseLight Workstation installation procedure. Further information on using the tools can be found in the User Manual.
3 - Installing Docker
How to install Docker on Oracle Linux 8
To install Docker on a server running Oracle Linux 8, some special configuration is needed. Much of this comes from the official documentation.
Prerequisites
First, make sure that Docker isn’t already installed:
yum list installed | grep docker
Remove any existing installations before proceeding.
Ensure that /opt (or whatever disk is to be used for Docker data) is formatted with the d_type option. You can find out like this:
$ xfs_info /opt
meta-data=/dev/mapper/vg0-lv_opt isize=512    agcount=4, agsize=5701632 blks
         =                       sectsz=4096  attr=2, projid32bit=1
         =                       crc=1        finobt=0 spinodes=0
data     =                       bsize=4096   blocks=22806528, imaxpct=25
         =                       sunit=0      swidth=0 blks
naming   =version 2              bsize=4096   ascii-ci=0 ftype=1
log      =internal               bsize=4096   blocks=11136, version=2
         =                       sectsz=4096  sunit=1 blks, lazy-count=1
realtime =none                   extsz=4096   blocks=0, rtextents=0
If the above says ftype=0, then the filesystem will need to be recreated (reference).
Installing Docker
sudo yum install -y yum-utils
sudo yum-config-manager --add-repo https://download.docker.com/linux/centos/docker-ce.repo
sudo yum install -y docker-ce
If this fails with error messages like package containerd.io-1.4.3-3.2.el8.x86_64 conflicts with runc provided by runc then you may have conflicting packages installed already. Try removing them like this:
sudo yum erase podman buildah
Post Install Configuration
To avoid running out of space on the root partition, you should configure docker to point to /opt/docker (reference):
sudo mkdir -p /opt/docker
sudo chown root:root /opt/docker
sudo chmod 701 /opt/docker
Next, configure Docker to use the overlay2 storage driver (reference).
Create a file at /etc/docker/daemon.json with this content:
{
  "data-root": "/opt/docker",
  "storage-driver": "overlay2"
}
You should also create a local user called “docker-nobody” with UID 4444, which can be used for running containers without root.
sudo groupadd -g 4444 docker-nobody
sudo useradd --uid 4444 --gid 4444 --shell /sbin/nologin docker-nobody
Finally, you can start Docker:
sudo systemctl enable docker
sudo systemctl start docker
Installing Docker Compose
You’ll also need to install the Docker Compose executable:
sudo curl -L "https://github.com/docker/compose/releases/download/1.23.2/docker-compose-$(uname -s)-$(uname -m)" -o /usr/local/bin/docker-compose
sudo chmod +x /usr/local/bin/docker-compose
Note that there are newer versions of the Docker Compose, but they have bugs that prevent them from working with our scripts. Please use the version above to ensure compatibility.
4 - Deploying JACS
Deploying the JACS services using Docker Swarm
This document assumes that you have downloaded and configured the installer according to one of the deployment guides.
The following steps are common to all Docker Swarm deployments of the Workstation.
Initialize Filesystems
The first step is to initialize the filesystems on all your Swarm systems. On each server, ensure that your REDUNDANT_STORAGE (default: /opt/jacs), NON_REDUNDANT_STORAGE (default: /data) directories exist and can be written to by your UNAME:GNAME user (default: docker-nobody).
Then, run the Swarm-based initialization procedure from HOST1:
./manage.sh init-filesystems
You can manually edit the files found in CONFIG_DIR to further customize the installation.
Once the initialization completes you can just run:
Also it is a good idea to stop the initialization stack if anything goes wrong before you try it again.
SSL Certificates
At this point, it is strongly recommended is to replace the self-signed certificates in $CONFIG_DIR/certs/* on each server with your own certificates signed by a Certificate Authority:
. .env
sudo cp /path/to/your/certs/cert.{crt,key} $CONFIG_DIR/certs/
sudo chown docker-nobody:docker-nobody $CONFIG_DIR/certs/*
If you continue with the self-signed certificates, you will need to set up the trust chain for them later.
External Authentication
The JACS system has its own self-contained authentication system, and can manage users and passwords internally.
If you’d prefer that users authenticate against your existing LDAP or ActiveDirectory server, edit $CONFIG_DIR/jacs-sync/jacs.properties and add these properties:
LDAP.URL=
LDAP.SearchBase=
LDAP.SearchFilter=
LDAP.BindDN=
LDAP.BindCredentials=
The URL should point to your authentication server. The SearchBase is part of a distinguished name to search, something like “ou=People,dc=yourorg,dc=org”. The SearchFilter is the attribute to search on, something like “(cn={{username}})”. BindDN and BindCredentials defines the distinguished name and password for a service user that can access user information like full names and emails.
Start All Containers
Next, start up all of the service containers. The parameter to the start command specifies the environment to use. The dev environment uses containers tagged as latest and updates them automatically when they change. The prod deployment uses a frozen set of production versions. When in doubt, use the prod deployment:
It may take a minute for the containers to spin up. You can monitor the progress with this command:
At this stage, some of the services may not start because they depend on the databases. The next step will take care of that.
Initialize Databases
Now you are ready to initalize the databases:
./manage.sh init-databases
It’s normal to see the “Unable to reach primary for set rsJacs” error repeated until the Mongo replica set converges on healthiness. After a few seconds, you should see a message “Databases have been initialized” and the process will exit successfully.
You can validate the databases as follows:
- Verify that you can connect to the Mongo instance using
./manage.sh mongo, and run show tables - Connect to the RabbitMQ server at http://HOST1:15672 and log in with your
RABBITMQ_USER/RABBITMQ_PASSWORD
Restart Services
Bounce the stack so that everything reconnects to the databases:
./manage.sh stop
./manage.sh start
Now you shoult wait for all the services to start. You can continue to monitor the progress with this command:
If any container failed to start up, it will show up with “0/N” replicas, and it will need to be investigated before moving further. You can view the corresponding error by specifying the swarm service name, as reported by the status command. For example, if jacs_jade-agent2 fails to start, you would type:
./manage.sh status jacs_jade-agent2
Verify Functionality
You can verify the Authentication Service is working as follows:
You should be able to log in with the default admin account (root/root), or any LDAP/AD account if you’ve configured external authentication. This will return a JWT that can be used on subsequent requests.
If you run into any problems, these troubleshooting tips may help.
Manage Services
As long as your Docker daemon is configured to restart on boot, all of the Swarm services will also restart automatically when the server is rebooted.
If you want to remove all the services from the Swarm and do a clean restart of everything, you can use this command:
To pull and redeploy the latest image for a single service, e.g. workstation-site:
./manage.sh restart jacs_workstation-site
The following crontab entries should be configured in order to perform periodic maintenance automatically. It’s easiest to install the crontabs on the docker-nobody account:
sudo crontab -u docker-nobody -e
Database maintenance refreshes indexes and updates entities permissions:
0 2 * * * /opt/deploy/jacs-cm/manage.sh dbMaintenance group:admin -refreshIndexes -refreshPermissions
SOLR index refresh (if using SOLR):
0 3 * * * /opt/deploy/jacs-cm/manage.sh rebuildSolrIndex
Database backups (if using containerized databases):
0 4 * * * /opt/deploy/jacs-cm/manage.sh backup mongo
Install The Workstation Client
Now that the services are all running, you can navigate to https://HOST1 in a web browser on your client machine, and download the Workstation client. Follow the installer wizard, using the default options, then launch the Workstation.
If you are using the default self-signed certificate, you will need to take some extra steps to install it on the client.
If you are using LDAP/AD integration, you should be able to log in with your normal user/password. If you are using the Workstation’s internal user management, you must first login as user root (password: root), and then select Window → Core → Administrative GUI from the menus. Click “View Users”, then “New User” and create your first user. Add the user to all of the relevant groups, including MouseLight.
Optional: Adding NFS Storage
If you have data on NFS, and those NFS drives can be mounted on the MouseLight hosts, that data can be made available to the Workstation.
First, create a file at deployments/mouselight/docker-swarm.prod.yml which looks like this:
version: '3.7'
services:
  jade-agent1:
    volumes:
      - /path/to/your/nfs:/path/to/your/nfs:ro,shared
  jade-agent2:
    volumes:
      - /path/to/your/nfs:/path/to/your/nfs:ro,shared
This will expose the path to both JADE agent containers. Now you need to configure the JADE agents to serve this data. On both hosts, edit /opt/jacs/config/jade/config.properties and add the following:
StorageVolume.mouseLightNFS.RootDir=/path/to/your/nfs
StorageVolume.mouseLightNFS.VirtualPath=/path/to/your/nfs
StorageVolume.mouseLightNFS.Shared=true
StorageVolume.mouseLightNFS.Tags=mousebrain,light
StorageVolume.mouseLightNFS.VolumePermissions=READ
You can use any name you want instead of mouseLightNFS. Then you should add this name to StorageAgent.BootstrappedVolumes:
StorageAgent.BootstrappedVolumes=jade1,mouseLightNFS
You will need to bounce the service stack to pick up these changes.
5 - Deploying ELK
How to deploy ELK for log monitoring
Currently ELK is only available in a swarm deployment because of how the ELK stack is configured.
Most of the set up necessary for ELK - configuration files and/or data directories - is already done as part of filesystem initialization performed while executing:
./manage.sh init-filesystems
The current ELK data directories are created on /data/ directory so this directory must exist.
One manual step is to set the vm.max_map_count value required for running elasticsearch. This is done by adding vm.max_map_count=262144 line to /etc/sysctl.conf and then run sysctl -p (typically this must be done as root)
After that deploying the elk stack for monitoring the application only requires starting with:
The command to stop the monitoring is:
Import data from an old stack
To import data from an old stack the old stack nodes must be whitelisted in the ELK_WHITELIST environment variable so that they can be accessible to the current cluster for importing indexes.
Some useful elasticsearch endpoints:
curl http://<escoordinator>:9200/_cat/indices
- Import an index from a remote cluster:
#!/bin/bash

remoteost=$1
indexName=$2

curl -H 'Content-Type: application/json' -X POST http://e03u08.int.janelia.org:9200/_reindex -d "{
    \"source\": {
        \"remote\": {
            \"host\": \"http://${remoteHost}:9200\"
        },
        \"index\": \"${indexName}\",
        \"query\": {
            \"match_all\": {}
        }
    },
    \"dest\": {
        \"index\": \"${indexName}\"
    }
}"
Here’s an example to export kibana visualizations but the command is identical for any one of [config, index-pattern, visualization, search, dashboard, url] - just set the appropriate type
curl http://<oldkibanahost>:5601/api/saved_objects/_export -H 'kbn-xsrf: true' \
     -H 'Content-Type: application/json' \
     -d '{"type": "visualization" }' > local/kibana-visualizations.ndjson
Use the file generated by the above export command and run
curl -X POST http://e03u06.int.janelia.org:5601/api/saved_objects/_import \
    -H 'kbn-xsrf: true' \
    --form file=@local/kibana-visualizations.ndjson
6 - Self-signed Certificates
Using self-signed server certificates
A self-signed certificate is automatically generated during the init-filesystem step of a jacs-cm installation. For production use, it is recommended that you replace this certificate with a real one. The self-signed certificate is less secure, and it requires some extra steps to get working.
In order to connect to https://HOST1, you need to accept the certificate in the browser. This differs by browser.
Then, in order to allow the Workstation to accept the certificate, it needs to be added to Java’s keystore. For this, you will need the certificate on the desktop computer where you are running the Workstation. You can either export it from the browser, or copy it over from the server. On the server, it is located in $CONFIG_DIR/certs/cert.crt. Once you have the certificate, you can import it using Java’s keytool.
Windows
On Windows, click Start and type “cmd” to find the Command Prompt, then right-click it and select “Run as administrator”. You need to find out where your JVM is installed by looking under C:\Program Files\Zulu. Then, import the certificate. Here it’s assumed the cert was saved to the current working directory:
C:\> "C:\Program Files\Zulu\zulu-8\bin\keytool.exe" -import -alias mouse1selfcert -file cert.crt -keystore "C:\Program Files\Zulu\zulu-8\jre\lib\security\cacerts" -keypass changeit -storepass changeit
The alias should be a descriptive name that will be used later if you want to remove or view the certificate. The password for the JVM keystore is actually “changeit”, so don’t change the keypass or storepass values above.
Mac or Linux
First, you need to know where the JVM is located. You can use the same method that the Workstation uses to locate the JVM. This ensures you are modifying the correct one. Open a Terminal and type:
export JDK_HOME=`/usr/libexec/java_home -v 1.8`
Now you can import the certificate into the keystore. Here it’s assumed the cert was saved to the desktop:
sudo keytool -import -v -trustcacerts -alias mouse1 -file ~/Desktop/cert.crt -keystore $JDK_HOME/jre/lib/security/cacerts -keypass changeit -storepass changeit
The alias should be a descriptive name that will be used later if you want to remove or view the certificate. The password for the JVM keystore is actually “changeit”, so don’t change the keypass or storepass values above.
7 - Storage volumes
Managing storage volumes on JADE
The Workstation/JACS system relies on JADE for its storage API.
Adding a new Storage Volume
Add bootstrap to the JADE configuration
On HOST1, edit /opt/jacs/config/jade/config.properties and add a block for your new volume, for example:
StorageVolume.s3data.RootDir=/s3data
StorageVolume.s3data.VirtualPath=/s3jade
StorageVolume.s3data.Shared=true
StorageVolume.s3data.Tags=aws,cloud
StorageVolume.s3data.VolumePermissions=READ,WRITE,DELETE
The properties configure the volume as follows:
- RootDir: defines the actual path to the data on disk
- VirtualPath: optionally defines a virtual path which is mapped to the actual path
- Shared: true if the volume should be accessible to all volumes
- Tags: tags used by applications to find appropriate volumes
- VolumePermissions: list of operations that JADE can execute (READ,WRITE,DELETE)
Also add your volume to StorageAgent.BootstrappedVolumes, so that it will be created the next time the service is restarted.
Mount the path into the containers
Edit the compose/swarm files for your deployment and mount the volume path as a Docker volume. For example, if your DEPLOYMENT is jacs, and STAGE is dev, you must edit these two files:
deployments/jacs/docker-compose.dev.yml
deployments/jacs/docker-swarm.dev.yml
You should add your volume for all services jade-agent<N> which you want to service that volume.
For example:
  jade-agent1:
    volumes:
      - /data/s3data:/s3data:shared
Restart the stack after making the changes above and the volume will be created when the JADE worker starts.
Host-specific Volumes
By default, all JADE agents are configured to serve all volumes in the database. You can use StorageAgent.ServedVolumes to control which volumes are served by which hosts.
8 - Data import
How to convert data into Horta format
In principle, any 3d volumetric data can be imported into the MouseLight Workstation.
At this moment we only provide some very basic tools for converting only TIFF format images into the expected format on disk. Another limitation of the current tools is that the entire volume must be in a single tiff file (per channel)
The imagery for MouseLight Workstation is a directory containing TIFF and KTX images organized into octrees. JACS compute includes a a service that can generate the octree data from a single volume TIFF file. If there is more than 1 channel, the channels are numbered 0 .. n-1 and each channel is expected to be in its own file. For example if you have 2 channels you would have two tiff files:
/path/to/volume/volume.0.tiff
/path/to/volume/volume.1.tiff
The import service requires docker or singularity installed because the actual conversion services are packaged in two docker containers - one that generates a TIFF octree and the other one that takes the TIFF octree and converts the octant channel images into the correspomding ktx blocks.
Currently pre-built containers for tiff octree tool and ktx tool are only available at Janelia’s internal registry, but the containers build files are available at https://github.com/JaneliaSciComp/jacs-tools-docker.git in the ’tiff_octree’ and ‘ktx_octree’ subdirectories, respectively. KTX tool container can also be built from https://github.com/JaneliaSciComp/pyktx.git.
Generating the sample octree requires only a JACS Async service call which is a simple HTTP REST call that can be done using curl or Postman. This service can also be invoked from the JACS dashboard http://api-gateway-host:8080 by going to the “Services List” after Login and selecting “lvDataImport”. The dashboard should also offer a brief description of each argument.
curl invocation to run the service with singularity (this is the JACS default):
curl -X POST \
  https://api-gateway-host/SCSW/JACS2AsyncServices/v2/async-services/lvDataImport \
  -H 'Accept: application/json' \
  -H 'Content-Type: application/json' \
  -H 'Authorization: Bearer Your_Token' \
  -d '{
        "args": [
                "-containerProcessor", "singularity",
                "-inputDir", "/path/to/volumeData",
                "-inputFilenamePattern", "test.{channel}.tif",
                "-outputDir", "/path/to/lvv/sampleData",
                "-channels", "0,1",
                "-levels", "4",
                "-voxelSize", "1,1,1",
                "-subtreeLengthForSubjobSplitting", 2,
                "-tiffOctreeContainerImage", "docker://registry.int.janelia.org/jacs-scripts/octree:1.0",
                "-ktxOctreeContainerImage", "docker://registry.int.janelia.org/jacs-scripts/pyktx:1.0"
        ],
 "resources": {
 }
}
'
curl invocation to run the service with docker:
curl -X POST \
  https://api-gateway-host/SCSW/JACS2AsyncServices/v2/lvDataImport \
  -H 'Accept: application/json' \
  -H 'Content-Type: application/json' \
  -H 'Authorization: Bearer Your_Token' \
  -d '{
 "args": [
  "-containerProcessor", "docker",
  "-inputDir", "/path/to/volumeData",
                "-inputFilenamePattern", "default.{channel}.tif",
  "-outputDir", "/path/to/lvv/sampleData",
  "-channels", "0",
  "-levels", "3",
  "-voxelSize", "1,1,1",
  "-subtreeLengthForSubjobSplitting", 3,
  "-tiffOctreeContainerImage", "registry.int.janelia.org/jacs-scripts/octree:1.0",
  "-ktxOctreeContainerImage", "registry.int.janelia.org/jacs-scripts/pyktx:1.0"
 ],
 "resources": {
 }
}
'
Arguments description
- containerProcessor - which container runtime to use docker or singularity
- inputDir - path to original volume data
- inputFileNamePattern - original tiff name. Notice that if you have multiple channels and the channel is anywhere in the name you can use
{channel} which will be replaced with the actual channel number. - outputDir - where the octree will be generated - typically this is the sample data directory that will be imported in the workstation
- channels - specifies a list of all available channels, e.g. ‘0,1’ if there are two channels or ‘0’ if there is only 1 channel.
- levels - the number of octree levels. This is left up to the user and the service will not try to figure out the optimum value for the number of octree levels.
- voxelSize - specifies the voxel size in um.
- tiffOctreeContainerImage - tiff octree container image. Not that the format is slightly different for specifying the image name if docker is used or if singularity is used. Since singularity supports docker images, if singularity runtime is used you need to explictily specify that the image is a docker image.
- ktxOctreeContainerImage - ktx octree container image. See above regarding the format based on container processor type.
- subtreeLengthForSubjobSplitting - this parameter applies only for the ktx processor and it tells the service how to split the job and it has a default value of 5. The conversion process typically starts at a certain node and it performs tiff to ktx conversion for a specified number of levels. If you start a process at the root and convert all levels the job may take a while so if you want you have the option to parallelize it by going only for a limited number of levels from the root and start new jobs from all nodes at the level equal with the subtree depth. For example if you have 8 levels and you set
subtreeLengthForSubjobSplitting to 3 then KTX conversion will start 1 + 8^3 + 8^6 = 1 + 512 + 262144 = 262657 jobs with the following parameters:
"" 3, "111" 3, "112" 3, ..., "118" 3, ..., "888" 3, ..., "111111" 3, ..., "888888" 3
If you leave the default (subtreeLengthForSubjobSplitting=5) then the KTX conversion will start only 1 + 8^5 = 32769 jobs ("11111" 5, ..., "88888" 5)
Note that the service invocation requires authentication so before you invoke it, you need to obtain an JWS token from the authentication service - see the Verify Functionality section on this page.
9 - Troubleshooting
Common issues and solutions
Docker
These are some useful commands for troubleshooting Docker:
View logs for Docker daemon
sudo journalctl -fu docker
Restart the Docker daemon
sudo systemctl restart docker
Remove all Docker objects, including unused containers/networks/etc.
sudo docker system prune -a
Swarm GUI
If you would like to see the Swarm’s status in a web-based GUI, we recommend installing Swarmpit. It’s a single command to deploy, and it works well with the JACS stack.
Common issues
config variable not set
If you see a lot of errors or warnings similar to the ones below, first check that the .env file was generated correctly - it should have all environment variables from .env.config, present and set. If it is not just remove it and try the commands again. It is possible that you may have run a command like ./manage.sh init-filesystems before the swarm cluster was available.
WARN[0000] The "CONFIG_DIR" variable is not set. Defaulting to a blank string.
WARN[0000] The "DATA_DIR" variable is not set. Defaulting to a blank string.
WARN[0000] The "DB_DIR" variable is not set. Defaulting to a blank string.
WARN[0000] The "BACKUPS_DIR" variable is not set. Defaulting to a blank string.
WARN[0000] The "CERT_SUBJ" variable is not set. Defaulting to a blank string.
WARN[0000] The "DEPLOYMENT" variable is not set. Defaulting to a blank string.
WARN[0000] The "MONGODB_SECRET_KEY" variable is not set. Defaulting to a blank string.
WARN[0000] The "API_GATEWAY_EXPOSED_HOST" variable is not set. Defaulting to a blank string.
WARN[0000] The "RABBITMQ_EXPOSED_HOST" variable is not set. Defaulting to a blank string.
WARN[0000] The "RABBITMQ_USER" variable is not set. Defaulting to a blank string.
WARN[0000] The "RABBITMQ_PASSWORD" variable is not set. Defaulting to a blank string.
WARN[0000] The "MAIL_SERVER" variable is not set. Defaulting to a blank string.
WARN[0000] The "NAMESPACE" variable is not set. Defaulting to a blank string.
WARN[0000] The "REDUNDANT_STORAGE" variable is not set. Defaulting to a blank string.
WARN[0000] The "REDUNDANT_STORAGE" variable is not set. Defaulting to a blank string.
WARN[0000] The "NON_REDUNDANT_STORAGE" variable is not set. Defaulting to a blank string.
WARN[0000] The "NON_REDUNDANT_STORAGE" variable is not set. Defaulting to a blank string.
“network not found”
If you see an intermittent error like this, just retry the command again:
failed to create service jacs-cm_jacs-sync: Error response from daemon: network jacs-cm_jacs-net not found
bind errors during init-filesystems
If during init-filesystems you see an error that the config folder could not be bound on a particular node of the swarm cluster, make sure you did not forget to create the config and db directories on each node that is part of the swarm. The directories must exist in order for docker to be able to mount the corresponding volumes.
After you created all folders if you already ran ./manage.sh init-filesystems and it failed before you run it again stop it using
and then you can try to re-run it
RESTful services
You can access the RESTful services from the command line. Obtain a JWT token like this:
The default admin account is called “root” with password “root” for deployments with self-contained authentication.
Now you can access any of the RESTful APIs on the gateway, for instance:
export TOKEN=<enter token here>
curl -k --request GET --url https://${API_GATEWAY_EXPOSED_HOST}/SCSW/JACS2AsyncServices/v2/services/metadata --header "Content-Type: application/json" --header "Authorization: Bearer $TOKEN"