HortaCloud is easily deployed on Amazon Web Services (AWS) using the AWS CDK to automatically provision resources.
This is the multi-page printable view of this section. Click here to print.
AWS
Learn how to deploy and operate your own HortaCloud instance on AWS
- 1: Estimated Costs
- 2: Best Practices
- 3: Deployment Steps
- 4: Backup & Restore
- 5: Upgrading
- 6: Data Import
- 7: Troubleshooting
1 - Estimated Costs
Cost estimates for running the system in the cloud using AWS services
Deploying this system on Amazon Web Services (AWS) incurs a monthly cost for AWS service usage.
In particular, the cost breakdown is roughly:
- $382/mo - Per user costs for running the Horta client on AppStream
- $277/mo - Back-end services running on EC2 (with Savings Plan)
- $76/mo - Storage (3 TB) for one sample image on S3
- $34/mo - Virtual Private Cloud (VPC)
Therefore, the minimum total cost per month for a single user would be about $770 ($9,237/year). For 2 users, the monthly cost would be $1130 ($13,570/year), etc. The full estimate can be found here.
We are assuming 8 hours of tracing per day, 5 days a week. If the system is not used for 8 hours a day, the cost will be less. You can dial in your own expected usage in the AWS calculator for an accurate cost estimate.
2 - Best Practices
Best practices for deployment of HortaCloud on AWS
The system has been designed to be easy to install and administer via standardized AWS CDK scripts and procedures which are well-documented in this online manual. In addition to following the deployment procedures, we recommend following DevOps best practices when deploying HortaCloud. These deployment practices are not enforced by the HortaCloud deployment procedures, and need to be customized for each deployment situation.
Deployment Best Practices
There are many deployment best practices which cannot be exhaustively covered here, but as an example blue-green deployments and canary deployments can be easily implemented in the context of HortaCloud:
- Blue-green deployment: 2 identical production environments where “blue” is the current production version and “green” is the new version. After a new release is validated, the labels are switched.
- Canary deployment: release new version to a subset of users. With a blue-green deployment, this can be done by asking a small subset of users to try the “green” environment before switching the labels.
In the case of severe issues, roll back to the previous version by switching labels again. In some case, the database will need to be restored to the backup made before the upgrade.
Monitoring
To avoid unexpected system downtime, the system should be monitored so that mitigations can be applied before a system failure. This monitoring can be done manually or automated via AWS services such as CloudWatch. In particular:
- The disk space on the EC2 instance should be monitored so that the system does not run out of space.
- Memory and CPU usage should be monitored on the EC2 instance and right-sized periodically by adjusting the EC2 instance type.
- The size of the database should be monitored and large fragment workspaces should be periodically culled.
Scaling
The HortaCloud architecture was designed for flexibility and scalability. However, the default configuration is intended for supporting 10 concurrent users working with 500 million total neuron fragments across multiple workspaces. Each workspace can support a maximum of 1 million neuron fragments at 5um spacing (taking up less than 10GB in the Database). Scaling the system past those limits will require either multiple deployments or thoughtful adaptations to the deployment. For example:
- The MongoDB database runs on the same EC2 instance as all of the other services by default. To scale the system to support more neuron fragments we recommend disaggregating the database onto a separate cluster, for example by using the MongoDB Atlas product.
- The default system runs on a single EC2 instance which runs a single JADE service instance for serving image data. To scale to larger numbers of concurrent users, we recommend adding additional JADE services, likely by scaling on to multiple EC2 instances. This is supported by the Docker Swarm architecture but would require changes to the AWS CDK scripts.
3 - Deployment Steps
How to deploy HortaCloud to your own AWS account
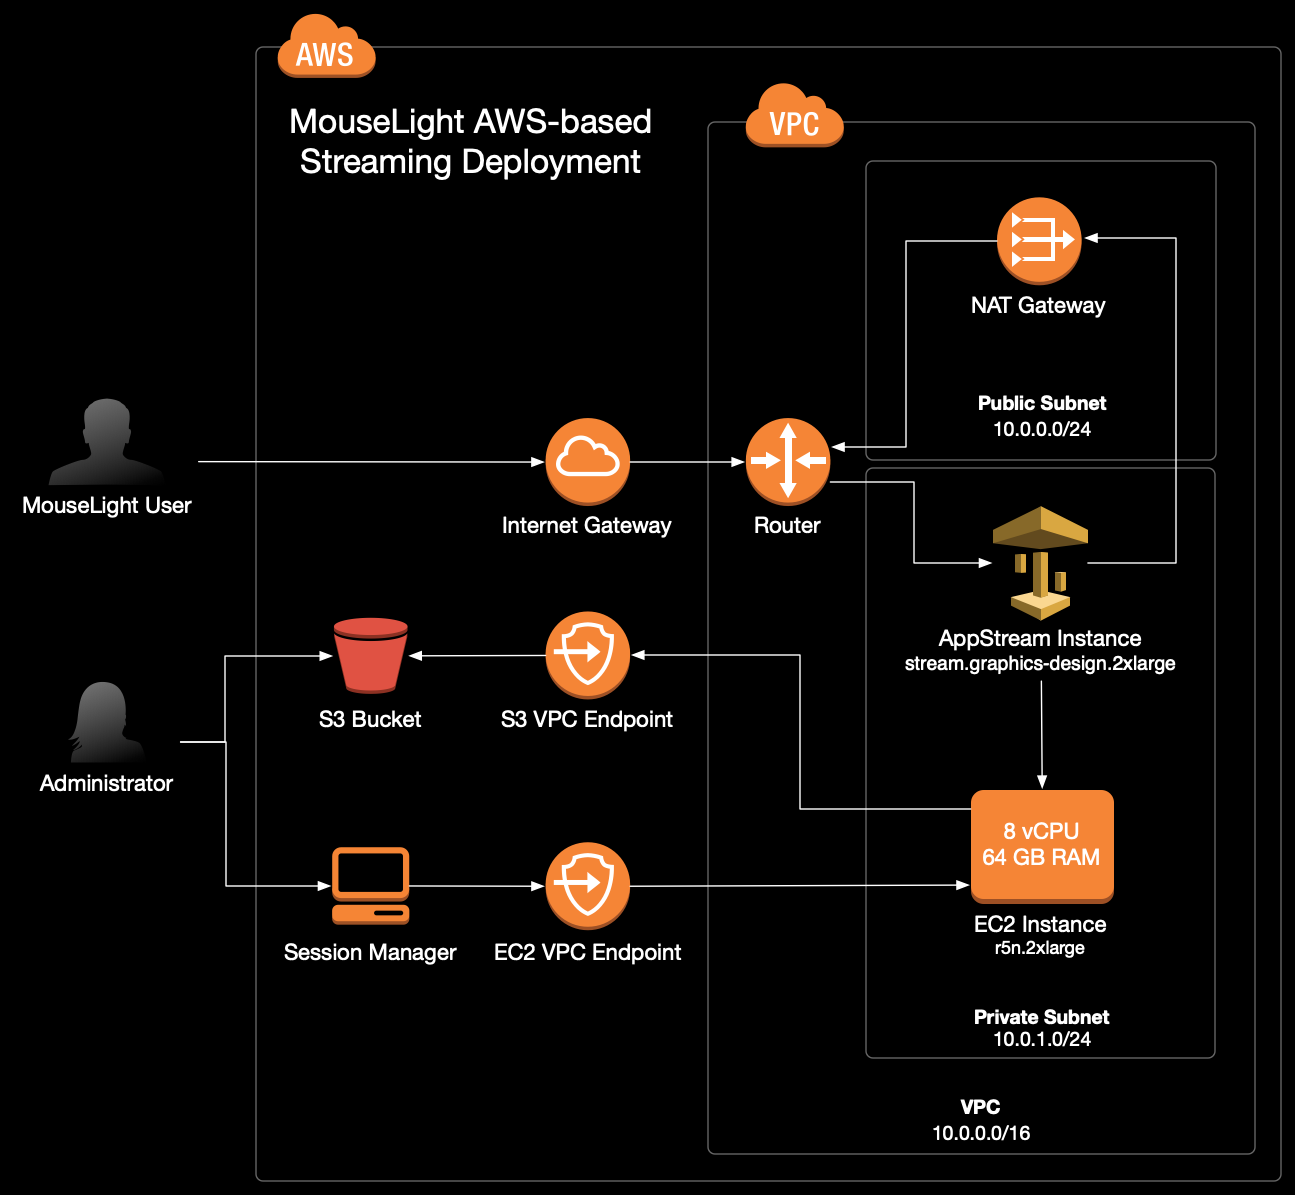
The deployment uses AWS CDK to create AWS resources on your AWS account as shown in the diagram below. All services run in a secured Virtual Private Cloud (VPC).
Install prerequisites
You should have node > v16 installed on your local machine. We recommend using nvm to install and activate this version of node.
- Install AWS CLI
- AWS CDK requires AWS CLI to be installed and configured on the computer from which one runs the deployment procedure. Installation & configuration instructions can be found in the AWS documentation.
Get the deployment scripts
Clone the HortaCloud GitHib repository containing the deployment scripts:
git clone https://github.com/JaneliaSciComp/hortacloud/
cd hortacloud
Install the dependencies:
npm install
npm run setup -- -i
This command will install all packages that are needed to run the deployment procedure. The ‘-i’ flag will tell the setup script to install npm packages for all application modules: cognito_stack, vpc_stack, workstation_stack and admin_api_stack. If you do not specify the ‘-i’ flag, the command will only check the .env file and create it in case it’s missing. Notice how the ‘-i’ flag is preceded by two hyhens ‘–’ - this is specific to npm not to cdk, so all script specific flags must be after the double hyphen separator.
Configure environment
The following values must be set in the .env file:
AWS_REGION=<your aws region>
AWS_ACCOUNT=<your aws account>

HORTA_ORG=<app qualifier name>
ADMIN_USER_EMAIL=<admin email>

JACS_JWT_KEY=<a 32 byte jwt secret>
JACS_MONGO_KEY=<a 32 byte mongo secret>
JACS_APP_PASSWD=<app password>
RABBITMQ_PASSWD=<rabbitmq password>
JACS_API_KEY=<jacs api key>
JADE_API_KEY=<jade api key>
HORTA_DATA_BUCKETS=<s3 buckets that hold MouseLight data>

NEW_HORTA_ENVIRONMENT=true
The api keys and secrets have been randomly generated during the setup step, but you can generate new ones with the following command:
openssl rand -hex 32
We prefer this procedure because these values will be handled during the installation using the sed command and it is preferable that they not contain any characters that require escaping in a sed command.
If you already have data on some S3 buckets you can add them to HORTA_DATA_BUCKETS as a comma separated list. For example, if you want to use Janelia’s Open Data bucket but in addition you also have your data on a private bucket (‘janelia-mouselight-demo’ in this example) you need to set HORTA_DATA_BUCKETS="janelia-mouselight-imagery,janelia-mouselight-demo". By default, only the MouseLight Open Data bucket is mounted. Every bucket specified in the ‘HORTA_DATA_BUCKETS’ list will be available in Horta as /s3data/<s3BucketName> directory.
If this is the first installation of HortaCloud and no restore from an existing backup is done, ensure that NEW_HORTA_ENVIRONMENT=true - this is needed to create the default admin user. For environments that are restored from an existing backup the flag must be set to NEW_HORTA_ENVIRONMENT=false since the admin user will be imported from the backup.
If you want to change the setting for HORTA_WS_INSTANCE_TYPE, keep in mind that you may have to change HORTA_WS_IMAGE_NAME.
For HORTA_WS_INSTANCE_TYPE set to any stream.graphics.g4dn.* instances:
stream.graphics.g4dn.xlargestream.graphics.g4dn.2xlargestream.graphics.g4dn.4xlargestream.graphics.g4dn.8xlargestream.graphics.g4dn.12xlargestream.graphics.g4dn.16xlarge
use: HORTA_WS_IMAGE_NAME=AppStream-Graphics-G4dn-WinServer2019-09-01-2022 image.
To enable a demo instance of HortaCloud with self-registration allowed, set in your environment
ENABLE_SELF_REGISTRATION=true
For HORTA_WS_INSTANCE_TYPE set to any stream.graphics-pro.* instances:
stream.graphics-pro.4xlargestream.graphics-pro.8xlargestream.graphics-pro.16xlarge
use HORTA_WS_IMAGE_NAME=AppStream-Graphics-Pro-WinServer2019-09-01-2022 image
Note: AWS deprecates the AppStream images relatively frequently so please make sure you use an AppStream-Graphics image that is available on AWS. You can see the available images from the AWS console if you select the “AppStream 2.0” service and then search “Images > Image Registry”
Configure AWS account
IAM Required Roles
In order to create an AppStream Image Builder, which is needed to create the Workstation Image, you need to have all roles required by AppStream. Check that by simply connecting to the AWS console and check if the Roles are available in the IAM Service - select “Services” > “Security, Identity, Compliance” > “IAM” then verify that the required roles are present:
- AmazonAppStreamServiceAccess
- ApplicationAutoScalingForAmazonAppStreamAccess
- AWSServiceRoleForApplicationAutoScaling_AppStreamFleet
Enable Google Drive and/or OneDrive for Horta Cloud Workstation
Data access from Google Drive or OneDrive can be enabled at deployment time by simply setting the corresponding enterprise domains in HORTA_GOOGLE_DOMAINS or HORTA_ONE_DRIVE_DOMAINS. This can also be done after deployment directly from the AWS Console while the stack is running. Check AWS Appstream docs how to enable these options directly from the AWS Console.
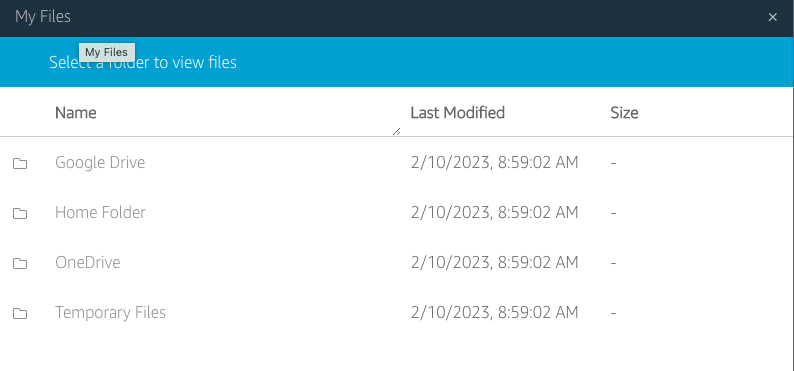
If your application does not see Google Drive and/or OneDrive for uploading or saving files, the storage must be added directly from the AppStream toolbar using the following steps (this procedure is fully documented in the AWS Docs):
Select My Files icon from the toolbar:

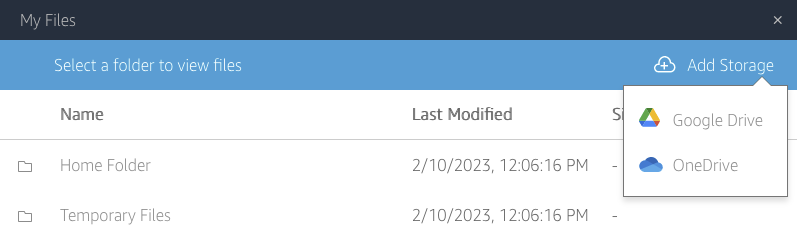
In the My File dialog click on Add Storage on the top right of the My Files dialog
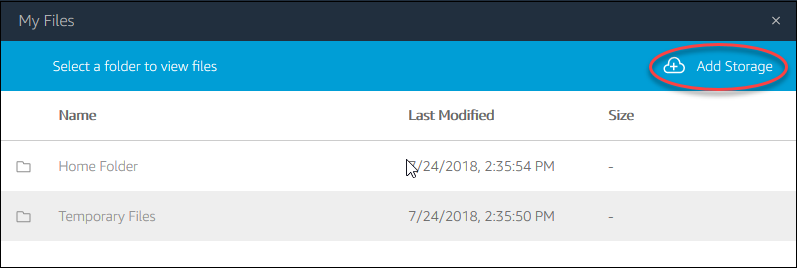
Then select the Drive and the account you want to use.
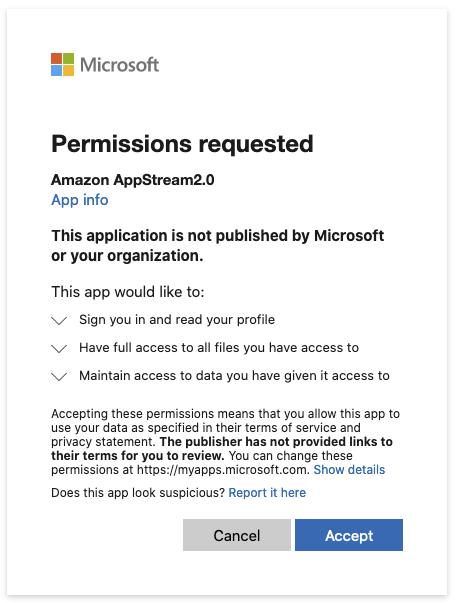
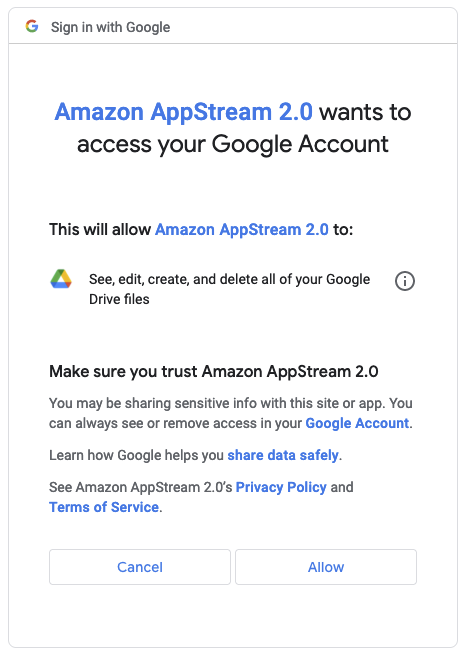
At this point if AppStream has not yet been authorized to access the selected storage, Google Drive or OneDrive may ask you to authorize AppStream to access the storage.
Once you authorized access to your storage, it will appear in the My Files dialog, and the Add Storage button will no longer be available
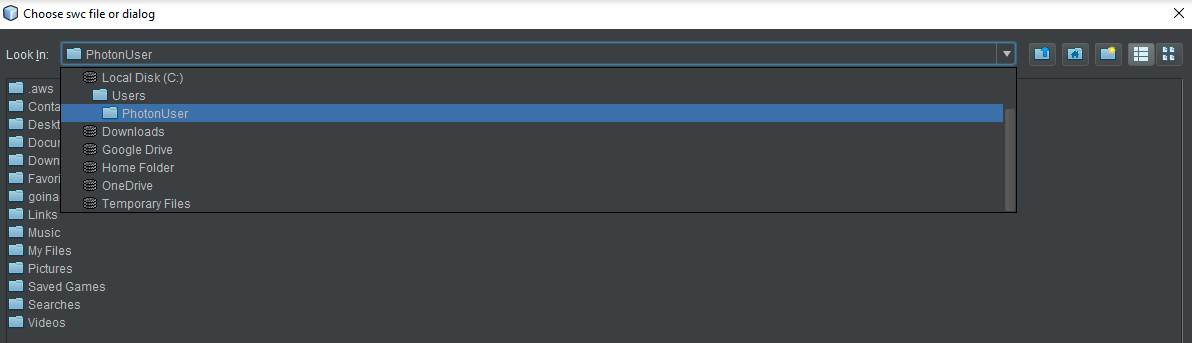
In the applications the new added storage options will look like this:
AWS Limits
Most AWS services allow you to setup restrictions on the number of active instances. The default limits, especially for some AppStream resources, such as “Maximum ImageBuilders” for some graphics instances - “stream.graphics.g4dn.xlarge” may be really low (0 in some cases). Connect to AWS console “Service Quotas” service and increase the limit for in case you see a limit was exceeded error. Typically take a look at the limits setup for your account for EC2, VPC, AppStream, S3. Keep in mind that limits may be different from instance type to instance type for AppStream service, so you may have to adjust the limits based on the AppStream instance type selection.
Deploy HortaCloud services
If this is the first time the application is deployed you will need to create a user login pool. This must be explicitly specified using ‘-u’ flag [See Deploy the user login stack section below]:
npm run deploy -- -u
⚠️ The user pool should only be created once.: including the ‘-u’ flag on a future update or deployment will replace all your users accounts!
After the setup is complete, subsequent deployments and updates to the application can be done by running:
npm run deploy
There are a few steps during the deployment that require manual intervention. The deploy script will indicate when these steps should be taken with a ⚠️ warning message.
The full deployment of the application is done in 3, or 4 steps - if user login stack is deployed too, that run automatically one after the other, with some manual intervention for AppStream builder step (third step outlined below):
Deploy the user login stack - this step is optional and practically is only needed first time the application is deployed. To create the user login stack you need to pass in ‘-u’ flag to the deploy command (
npm run deploy -- -u) which will automatically create a Cognito user pool and the ‘admin’ user and ‘admins’ group. You also have an option to import cognito users from a backup (npm run deploy -- -u \ -r -b janelia-mouselight-demo -f hortacloud/backups/20220511030001/cognito) but in this case you may need to skip the creation of the default admin user and group.Deploy the back-end stacks - this includes the AppStream builder. At the back end deployment the installation process will also create the admin user configured in
ADMIN_USER_EMAIL.Connect to AppStream builder and install the Horta application - This is a semiautomated step that involves copying and running two PowerShell scripts onto the AppStream builder instance.
Deploy the administration stack.
Install the Horta desktop application
For client installation start and connect to the AppStream builder instance then copy the following scripts from this repo to the AppStream instance:
- installcmd.ps1 - installs JDK and the Horta application
- createappimage.ps1 - creates the AppStream image
After you copied or created the scripts:
- Log in to the AWS console and go to https://console.aws.amazon.com/appstream2
- Find your new builder in the “Images > Image Builder” tab
- Click on the image name and open an “Administrator” window by clicking on the “Connect” button.
- Copy the installation scripts from your local machine to AppStream:
- Click on the folder icon at the top left of the window
- Select the
Temporary Filesfolder - Use the
Upload Filesicon to find the files on your machine and upload them.
- Open the powershell by typing “`Power shell” in the search found at the bottom left of the window. This step used to require an “Administrator Power Shell” but now it needs only a regular user power shell and it may actually fail the install if you run it in an Administrator Power Shell.
- Change to the directory where you uploaded the installation scripts, eg:
cd 'C:\Users\ImagebuilderAdmin\My Files\Temporary Files'
- Run the installcmd script to install Horta. <serverName> is the name of the backend EC2 instance, typically it looks like
ip-<ip4 with dashes instead of dots>.ec2.internal. Instructions for locating this are provided as output from the installer script. The Horta client certificate is signed using the ec2 internal name so do not use the actual IP for the <serverName> parameter, because user logins will fail with a certificate error.
installcmd.ps1 <serverName>
This will install the JDK and Horta. The installer will run silently and it will install the Horta application under the C:\apps folder. If it prompts you for the install directory, select C:\apps as the JaneliaWorkstation location.
- Optional - To start Horta for testing, run:
c:\apps\runJaneliaWorkstation.ps1
when prompted, login as the admin user you set in ADMIN_USER_EMAIL (leave the password empty)
Navigate through the menus to make sure Horta is working. Do not create any user accounts at this time as they will get created from the Admin web application.
When testing is finished, close down Horta.
Finalize the creation of the AppStream image, run:
createappimage.ps1
Keep in mind that once you start this step the builder instance begins the snap shotting process and it will not be usable until it completes. After this is completed the AppStream image should be available and the builder will be in a stop state. To use it again you need to start it and then you can connect.
- You can now safely close the AppStream session and return to the AppStream console. There you will see a new image in the image registry with a status of
Pending. - Once the image status has changed to a status of
Availableyou can start the fleet by going to theFleetspage on the AppStream site.- Select your fleet from the list of fleets and then select ‘Start’ from the
Actionmenu.
- Select your fleet from the list of fleets and then select ‘Start’ from the
- At this point the installation script you started on your host machine, should continue to completion.
Customizing the portal URL
By default the application will have a very long url that is not easy to remember, something like:
http://janelia-hortacloudwebapp-janeliahortacloudwebadmi-yefcny29t8n6.s3-website-us-east-1.amazonaws.com/. Follow these instructions to create a shorter domain for use with your installation.
- Register a domain with Route53 or your domain provider.
- The Route53 page in the AWS console has a “Register domain” form.
- Alternative providers can also be used, but it requires a little more work.
- Purchase an SSL certificate for your domain.
- This can be done with AWS Certificate Manager
- or an external certificate provider, often it can be done with the same company that provided your domain registration. Use the “Import a certificate” button to register your certificate with AWS.
- Use the “Create distribution” button on the CloudFront console to attach your registered domain to the s3 bucket that hosts the admin portal.
- the only things that need to be changed from the defaults are
- “Origin domain” - this should be the domain that was originally generated for your admin portal. eg: janelia-hortacloudwebapp-janeliahortacloudwebadmi-yefcny29t8n6.s3-website-us-east-1.amazonaws.com
- “Viewer protocol policy” - Change this to “Redirect HTTP to HTTPS”
- “Custom SSL certificate” - Select the certificate that you registered with AWS Certificate Manager
- Finally, click the “Create distribution” button.
- the only things that need to be changed from the defaults are
Configuring demonstration Hortacloud site
To finish setting up self-registration for a demo Hortacloud site, run the post-deployment script to add a post-confirmation trigger to Cognito to synchronize the self-registered user with the HortaCloud database
npm run post-deploy
Uninstalling HortaCloud services
To completely uninstall the application run:
npm run destroy -- -u
The command will uninstall all stacks including the user logins (Cognito) stack.
Note in the previous system upgrade section that an upgrade typically does not require removing and recreating the user pool stack.
Troubleshooting
Troubleshooting client app installation
If the client app installation fails for any reason, before you attempt the install again you must remove everything that was installed by the install script. Uninstall all applications installed with scoop and remove the ‘C:\apps’ folder. To do that run:
scoop uninstall scoop
del c:\apps
When prompted whether you really want to uninstall everything, select “yes” or “all”.
4 - Backup & Restore
How to backup your HortaCloud data
System backup
The system can be configured to take nightly backups. All it is needed is to specify a writeable bucket (HORTA_BACKUP_BUCKET) that will hold the backups. You can also specify the base prefix for the backups using HORTA_BACKUP_FOLDER. If this is not specified the prefix will default to “/hortacloud/backups”.
Currently the backup contains the Cognito users and the Mongo database (user-generated metadata and tracing data). Each backup will be stored in a timestamp (with format “yyyyMMddHHmmss”) folder under the base backup prefix. The location of the backups will be s3://<backup_bucket>/<backup_folder_prefix>/<timestamp>/jacs for the database and s3://<backup_bucket>/<backup_folder_prefix>/<timestamp>/cognito for cognito users.
The backup is configured as a cron job that runs daily at 3 AM local time on the EC2 host on which the backend services run.
System restore
If system backups are available, the sample and tracing data can be restored by specifying a specified backup bucket (HORTA_RESTORE_BUCKET) and prefix (HORTA_RESTORE_FOLDER) which typically was created by the nightly backup job.
5 - Upgrading
Upgrading to a new version of HortaCloud
There are two ways to upgrade to a new version of the code: Full Upgrade and Incremental Upgrade.
Full Upgrade
This method backs up all of the data, removes the existing HortaCloud stack, installs a new version from scratch, and restores the data. This is currently the most automated way to upgrade, and requires the least amount of effort.
Backup your data
First, ensure that you have a recent data backup. If you have not configured backups, do that first. For most upgrades, you only need to check if a backup for the JACS Mongo database exists. Typically this is located at s3://<HORTA_BACKUP_BUCKET value>/<HORTA_BACKUP_FOLDER value>/<timestamp>/jacs. If your data is large, you may experience issues with the automatic restore that is performed during the full upgrade. In this case you can perform a manual restore of your data, which is detailed below. To perform a manual backup, you can run the following utility script that will perform a backup.
- <deployment directory, something like /opt/deploy/jacs>/local/run-backup.sh. This script will perform a backup of the database as well as your cognito authentication pool.
- If this script isn’t present, you can run the manage.sh script (usually located in the deployment directory), which will only backup the mongo database
- ./manage.sh mongo-backup <location of mongo jacs backup folder eg., /s3data/backups-bucket/hortacloud/backups/jacs>
Remove HortaCloud environment
To remove the current HortaCloud environment run this command:
npm run destroy
This command will uninstall the frontend and the backend AWS Cloudformation stacks, i.e., Admin, Appstream and JACS stacks, but it will not uninstall Cognito stack, so no user accounts will be removed.
Deploy new version of HortaCloud
The next step is to upgrade the local git repo:
git pull
You should also check out a specific version tag that you want to deploy:
git checkout <version>
In order to restore the database from an existing backup make sure the following properties are set:
NEW_HORTA_ENVIRONMENT=false
HORTA_RESTORE_BUCKET=<backup bucket name>
HORTA_RESTORE_FOLDER="/hortacloud/backups/latest"
HORTA_RESTORE_BUCKET is the name of the backup bucket and HORTA_RESTORE_FOLDER must reference the parent prefix containing the ‘jacs’ folder - the location of the actual mongo backup. Typically the backup job creates a “softlink” - “/hortacloud/backups/latest” so if you simply set the restore folder to that it should pick up the latest backup. If the backup was a manual backup or you need to restore to a previous date set the restore folder to that folder. For example setting HORTA_RESTORE_FOLDER=/hortacloud/backups/20220609030001 will restore the database to the content saved on Jun 9, 2022.
NEW_HORTA_ENVIRONMENT must be set to false so that we don’t try to create another admin user which may clash with the one restored from the backup.
After setting these properties you can proceed with the actual deploy procedure which will only install the backend and the frontend stack (skipping any Cognito installation):
npm run deploy
From here on, this approach is identical with the initial deployment, with the only exception that data and users should already exist once the backend stack is fully deployed.
After you start the deploy command, follow the instructions you see on the screen which will prompt you when you need to setup the AppStream Builder exactly as it is described in the Workstation app-installation section
If somehow you need to recreate the user login accounts because you inadvertently removed the Cognito stack as well (e.g. using -u flag) you can restore all the accounts from a previous backup using the following command:
npm run deploy -- -u -r -b <backup bucket> -f hortacloud/backups/manual-backup/cognito
The folder parameter must point to the actual cognito prefix, where ‘users.json’ and ‘groups.json’ are located
Incremental Upgrade
Incremental approach requires more manual steps, but it does not require any data restore. It basically removes only the frontend stacks, i.e. Appstream and Admin App, and it requires a manual update of the backend stack and the workstation.
The steps for the incremental approach are the following:
Remove only the frontend stacks:
npm run destroy -- -bFrom the AWS console connect to the EC2 instance (
<ORG>-hc-jacs-node-<STAGE>) running the JACS stack using the “Session Manager”. To be more specific, from the EC2 instances page, select the instance<ORG>-hc-jacs-node-<STAGE>and click on the “Connect” button. This will take you to the instance page, and then from there select the “Session Manager’ tab and click the “Connect” button again. The “Connect” button should be enabled - if it’s not there either was a problem with the deployment or there might be a problem with the instance itself.Once connected run the following commands
cd /opt/jacs/deploy
./manage.sh compose down
sudo git pull origin master
sudo git checkout <version>
./manage.sh compose up -d
Start AppStream builder (
<ORG>-hc-image-builder-<STAGE>)Connect as Administrator
Check that ‘reinstallwsonly.ps1’ script is available, in the Admin’s home directory. If not copy it from the application repo or just create it like the other install scripts, (‘installcmd.ps1’ and ‘createappimage.ps1’) were created on the initial deployment.
Run the reinstallwssonly.ps1 script:
.\reinstallwssonly.ps1 <IP of host running JACS stack>The IP of the host running JACS is the same used for initial run of ‘installcmd.ps1’ and it can be found from the AWS console.
Try out the workstation application to make sure it works
C:\apps\runJaneliaWorkstation.ps1Make sure you have the latest ‘createappimage.ps1’ script from the application git repository. If you don’t copy the latest script that supports ‘–skip-registration’ flag.
Start the script for creating the AppStream image but skip the application registration:
.\createappimage.ps1 --skip-registrationReinstall the frontend stacks
npm run deploy -- --skip-vpcIf no changes were made to the code AWS CDK will only update the missing stacks, leaving JACS stack as it was since it practically has not been changed from AWS’ perspective
Restore Your data
If there is a problem with the automatic restoration of your data, you can restore manually using the following process. Be aware that the restoration process can take a long time for large database restoration.
- <deployment directory/local/run-restore.sh. This script will perform a restoration of the database as well as your cognito authentication pool.
- If this script isn’t present, you can run the manage.sh script (usually located in the deployment directory), which will only restore the mongo database
- ./manage.sh mongo-restore <location of mongo jacs backup folder eg., /s3data/backups-bucket/hortacloud/backups/jacs>
6 - Data Import
How to get image data into the system
Adding the MouseLight Open Data
The MouseLight project at Janelia has made available the complete imagery and neuron tracing annotations for its published data sets on the AWS Open Data Registry.
You can easily make these available in your own HortaCloud instance by creating a Synchronized Folder which points to /s3data/janelia-mouselight-data.
Adding a single volume
A Horta Sample is an object representing a single 3D volume that can be visualized and traced with Horta.
If you already have the HortaKTX format data in your mounted S3 buckets, select File → New → Horta Sample, and then set “Sample Name” to <sampleDirectoryName> and “Path to Render Folder” as /s3data/<bucketName>/<sampleDirectoryName>.
Open the Data Explorer (Window → Core → Data Explorer) and navigate to Home, then “3D RawTile Microscope Samples”, and your sample name. Right-click the sample and choose “Open in Horta”. This will open the Horta Panel and then from the Horta Panel you have options to create a workspace or to open the 2D or the 3D volume viewer.
Converting your data
If your data has not been converted into HortaKTX format, you can use the HortaCloud Data Importer to convert it. This tool supports many common image formats, and can be easily extended in Python to support your favorite format.
7 - Troubleshooting
Troubleshooting HortaCloud services
No user can login to the workstation
We have seen this behavior if the “/data” volume ran out of space. You can check this by connecting to the EC2 instance running the JACS stack and running df -h /data.
If the disk is full you, you can try to find anything that could be removed but if the limit was reached because the size your data you really have to resize the volume. The steps to resize an EBS volume can be found in the AWS documentation. First run the instructions to increase the size of and EBS volume and then the instructions that make the entire new disk space available to the EC2 instance
If users still cannot use the workstation for tracing, after the /data volume was resized, and there is plenty of disk space available, the reason might be that RabbitMQ failed to start properly, which may happen if RabbitMQ runs out of disk space. Users can also inspect the log from the workstation and look for errors like:
java.lang.IllegalStateException: Message connection could not be opened to host <hostip> after <n> attempts
If this is case check the size of the file /data/db/rabbitmq/jacs/mnesia/rabbit\@jacs-rabbit/msg_stores/vhosts/628WB79CIFDYO9LJI6DKMI09L/recovery.dets If the file exists and its size is 0 then remove the file and restart the entire stack.